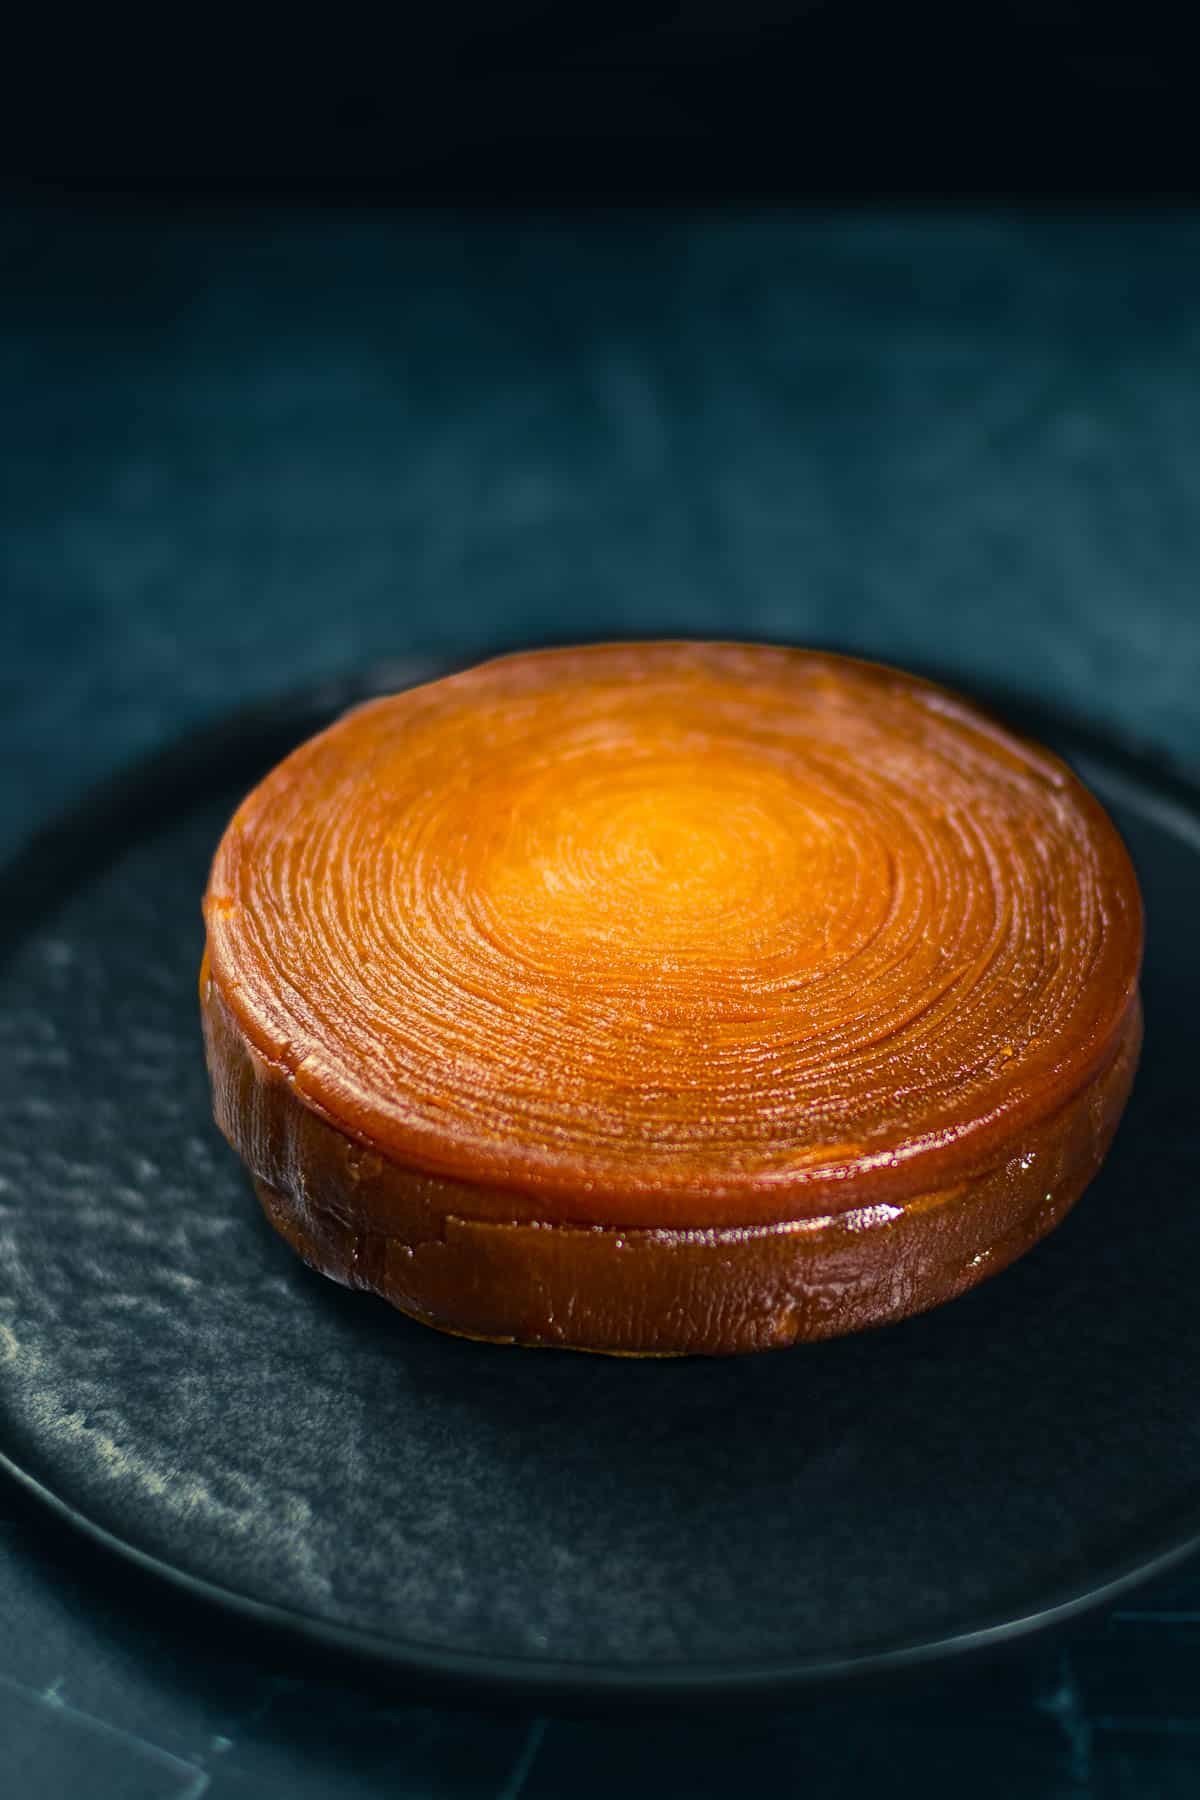
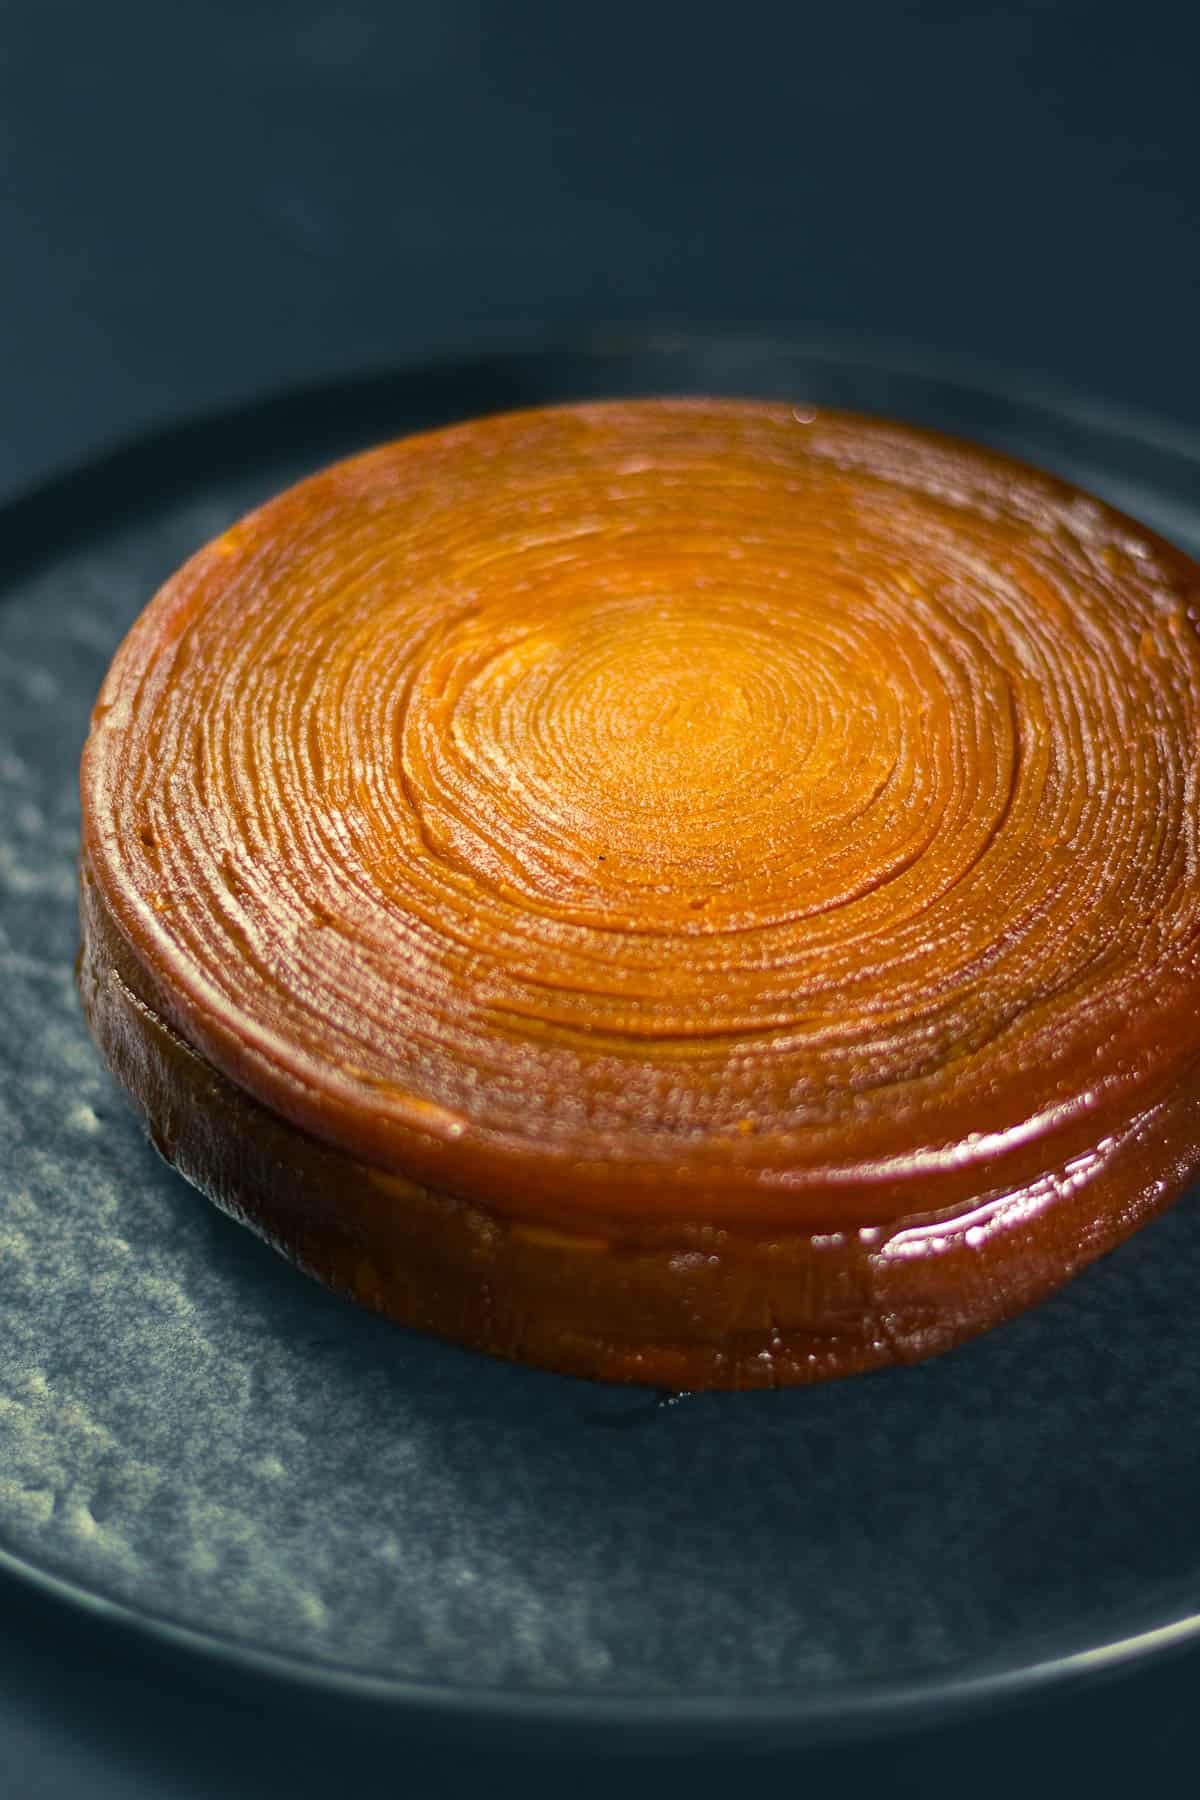
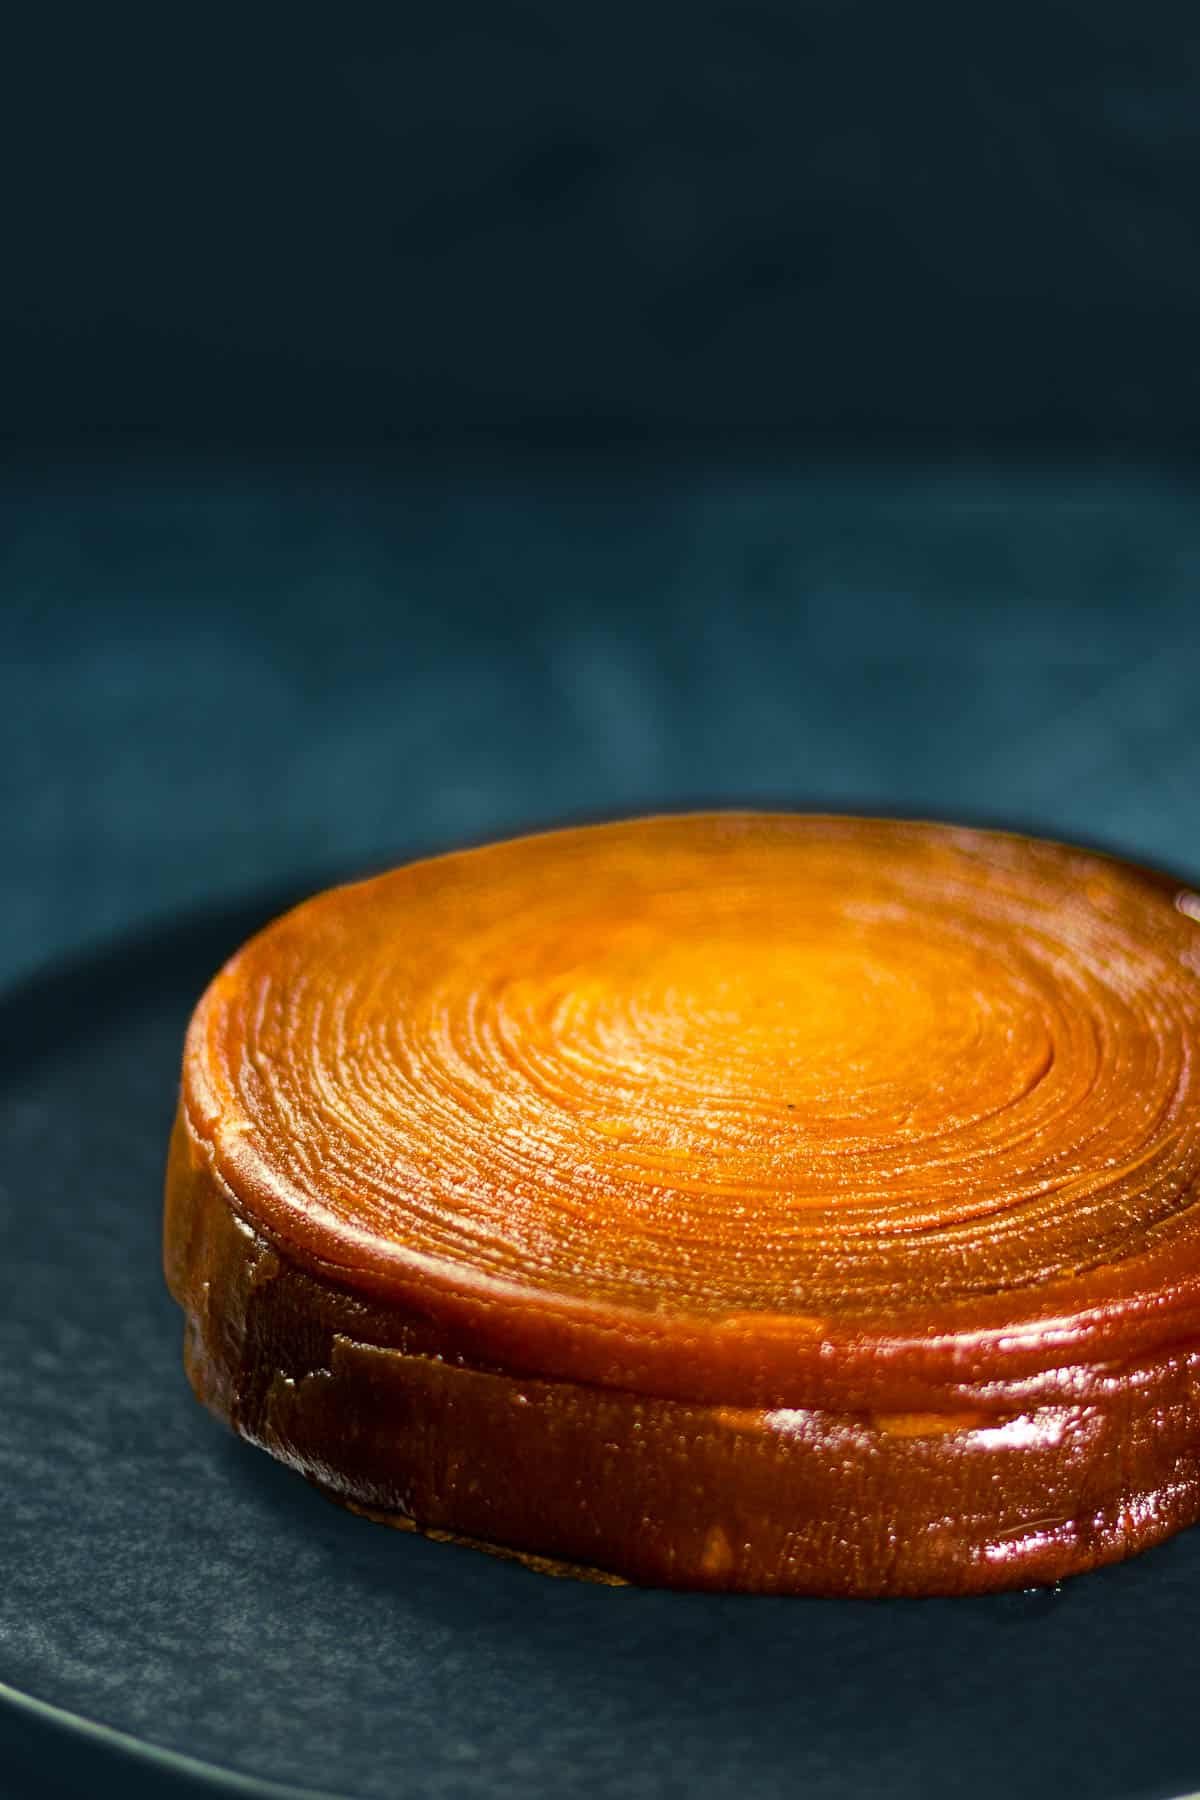
A stylish French pastry tarte tatin, with its exquisite caramelized apples and crispy pie crust. This recipe for Spiral Tarte Tatin requires only 5 ingredients.
Jump to:
Watch the Recipe Video
An unusual tarte tatin!
Recipe for Tarte Tatin with Olive Oil by French pastry chef William Lamagnère.
Since the first time I saw it, I've always been intrigued by this Tarte Tatin! I've been wanting to make it for a while, but the recipe I came across required using a vegetable sheet slicer, which I had never used before. So, I hesitated and ended up experimenting with other methods to see if I could achieve the same result.
Eventually, the cost of buying a large amount of apples outweighed the expense of the vegetable sheet slicer, so I decided to make the purchase. As it turned out, using the slicer made the process much easier and I was able to achieve the desired appearance without any difficulties. It seems that having a sheet slicer is crucial if you want to create this specific look.

Get ready with plenty of apples and let's get started!
Start by using the sheet slicer to cut the apples into sheet-like slices, and then use them to create a large spiral-shaped cluster. Bake it together with caramel.
Using the sheet slicer is easy, but initially, it may be challenging to achieve consistent width, and you might wonder how much to trim. As you experiment and make adjustments, you'll realize that you need a substantial amount of apples...
Even though I bought fairly large apples, I needed around 15 apples for a 15cm pan, including accounting for the ones that didn't turn out well. If you can slice them more efficiently, you might need fewer apples, but it's advisable to have extra on hand to avoid running out of apples midway through (I had to make a quick trip to buy more). For those who lack confidence or want to try it out, starting with a smaller pan size would be relatively easier.
Ingredients
Apple dough
Even though the Tart Tatin looks luxurious, it requires only 5 ingredients.
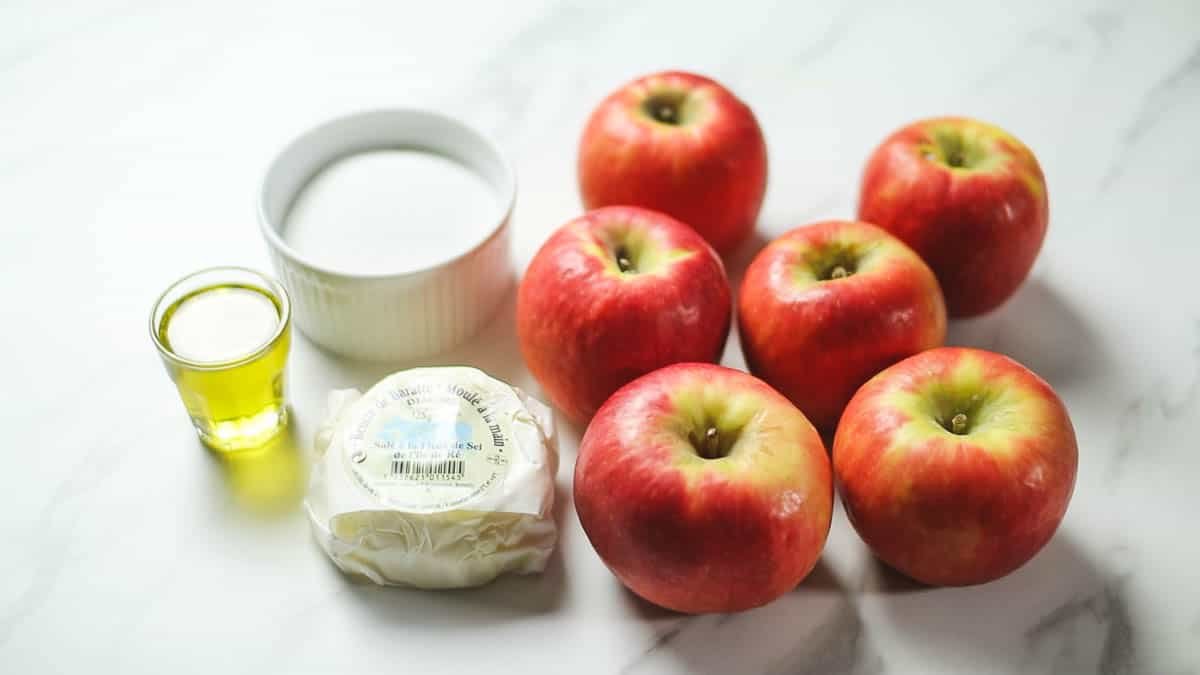
- Granulated sugar
- Butter (salted) - I usually use unsalted butter for sweets, but since I wanted to make salted butter caramel, I used salted butter If you only have unsalted butter at home, try adding a small amount of salt.
- Olive oil (extra virgin)
- Apples - Use apples that hold their shape well even when heated. In this recipe, I used Pink Lady apples. (In the photo, there are only 5 apples, but in reality, I used about three times that amount...)
Pie crust
- Pie crust (store-bought or homemade) - cYou can use store-bought or homemade pie crust for this recipe. To support the weight of the apple filling, it's recommended to roll out the crust slightly thicker and use a baking sheet or similar item to create a compact and sturdy pie crust.
For a traditional Tart Tatin, it is common to layer caramelized apples in a pan and then top it with the pastry crust, without pre-baking the crust. However, in this recipe, since you wanted the apple filling to have a longer baking time and a nice golden color, you decided to bake the crust separately and assemble it at the end.
While you can use tart dough instead of pie crust for Tart Tatin, if you're following the method of baking the crust separately, pie crust is recommended.
The reason is that when you bake the crust separately, there is some shrinkage during baking, and it can be a bit challenging to achieve the perfect size that is neither too big nor too small. When you initially tried using tart dough, it turned out slightly larger, and when you tried to fit it into the pan by trimming the edges, it ended up getting stuck and breaking apart when you tried to remove it.
Pie crust is more forgiving when it comes to trimming, and it has a bit more flexibility compared to tart dough, making it easier to work with and less prone to breakage.
Instructions
Preparations
Preheat the oven to 160°C (320°F) 10 minutes before using.
Salted butter caramel
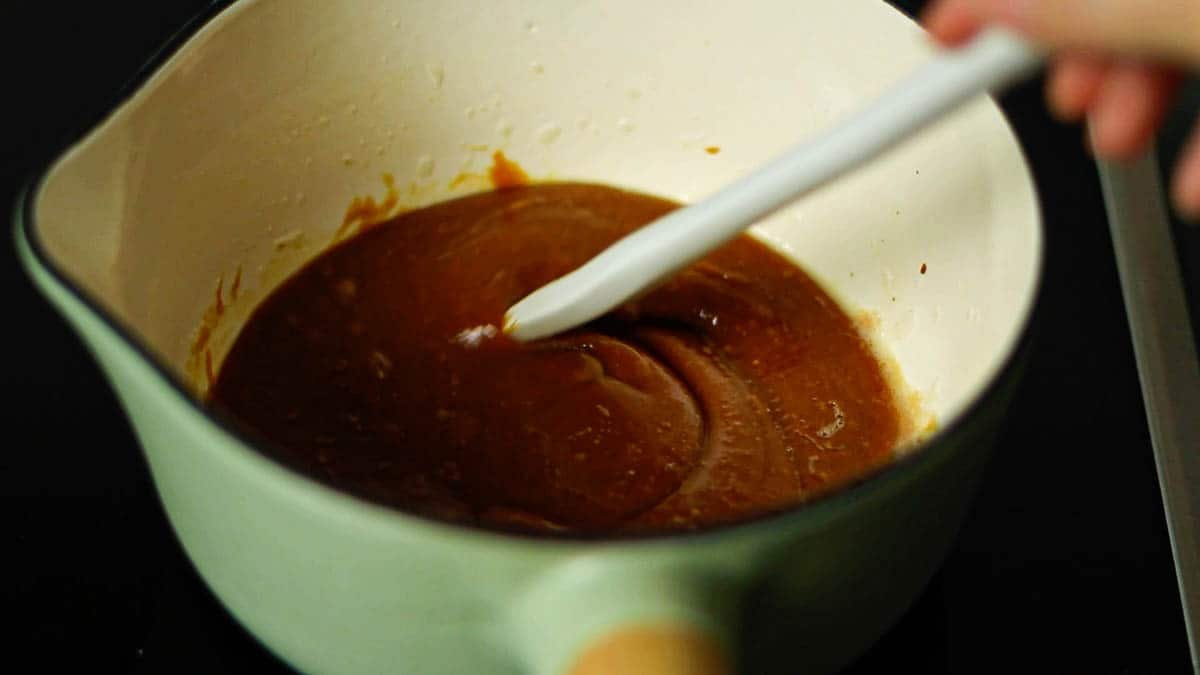
To make caramel, put granulated sugar in a saucepan and heat it over medium heat. As the edges of the pan start to turn caramel brown, tilt the pan or quickly mix it with a spoon to evenly caramelize the sugar.
Once the caramel is ready, add butter and mix it together. Initially, large bubbles may form, but they will quickly settle down. Once they start to settle, continue mixing until it reaches a creamy consistency.
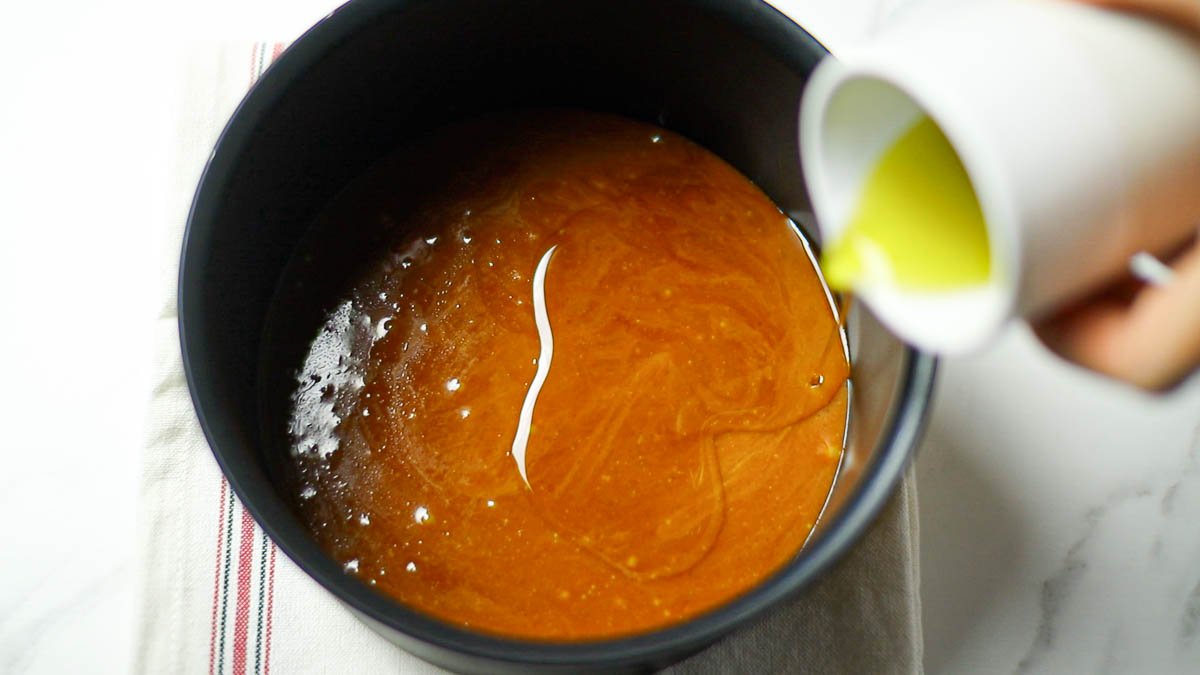
Pour the caramel into the mold Wait 5 minutes for it to cool, then pour in half the olive oil (20 ml).
How to Use Vegetable Sheet Slicer
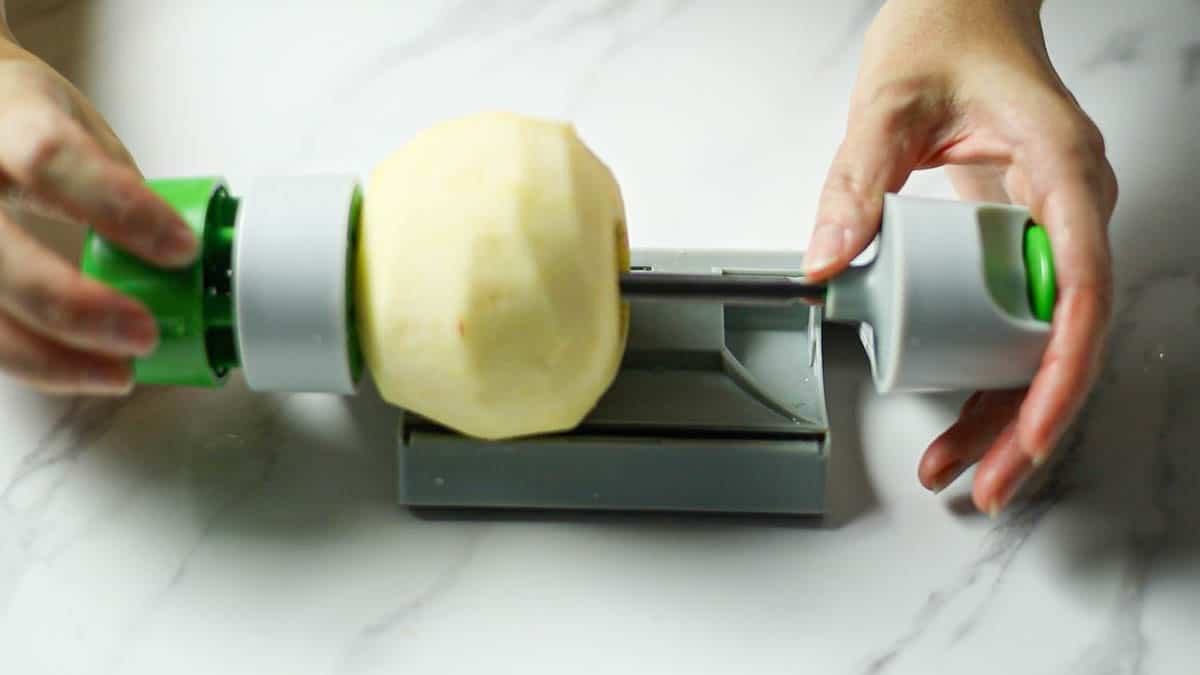
First, wash the apples and peel off the skin. Use a vegetable sheet slicer to create apple sheets.
Start by removing the handle-like part attached to the right side. Open the central blade attached to the spring mechanism, remove the thick needle, and place the apple on the base. Insert the needle into the core of the apple and reattach the previously removed handle part. It requires some force to firmly insert the tool into the apple, but press it firmly until it clicks into place for proper functionality.
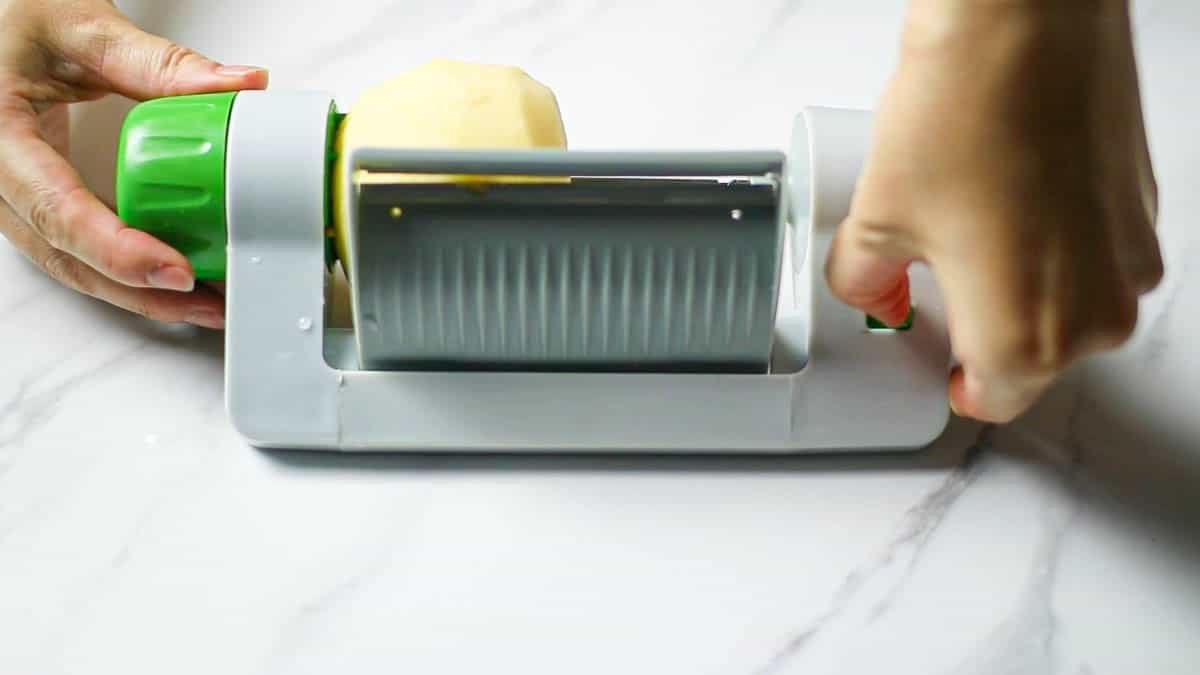
Once the apple is properly set, lower the spring mechanism with the attached blade. Make sure that the small green switch is on the outer side (left side) when doing this.
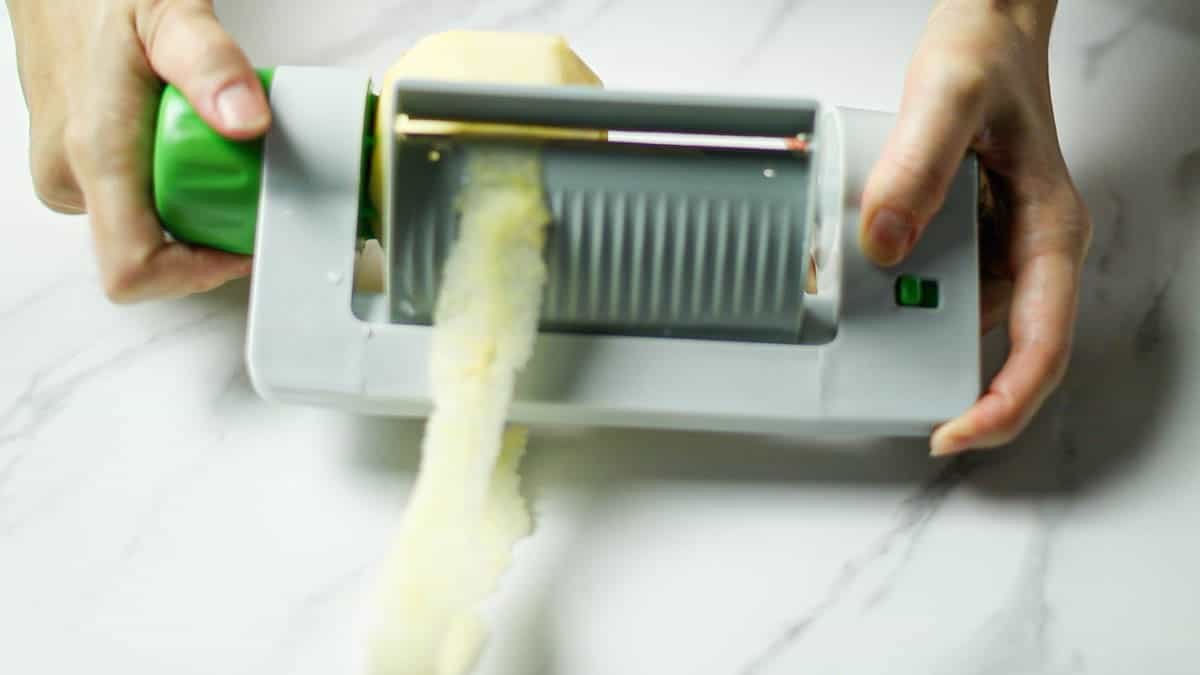
Turn the handle to start creating apple sheets. Initially, only narrow sheets will be produced, so you don't need to use this part.
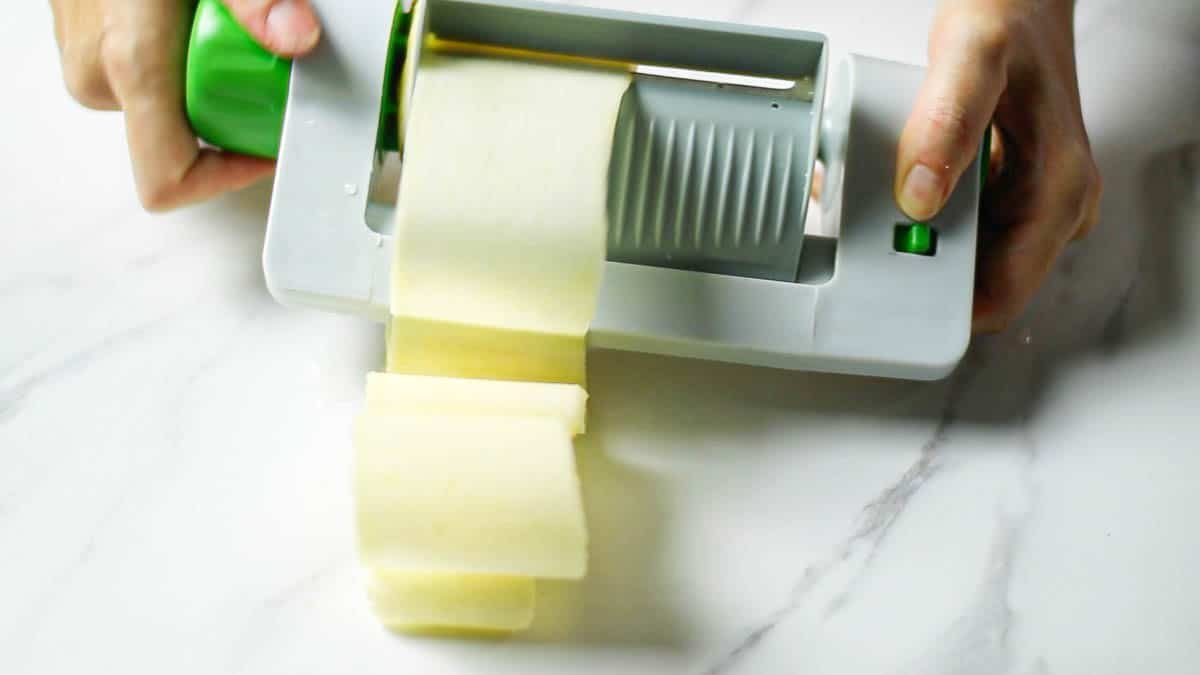
As you continue turning, the width of the sheets will gradually widen. Start using the sheets from that point. When you reach the core of the apple and it becomes visible, replace the apple with a new one.
Apple dough
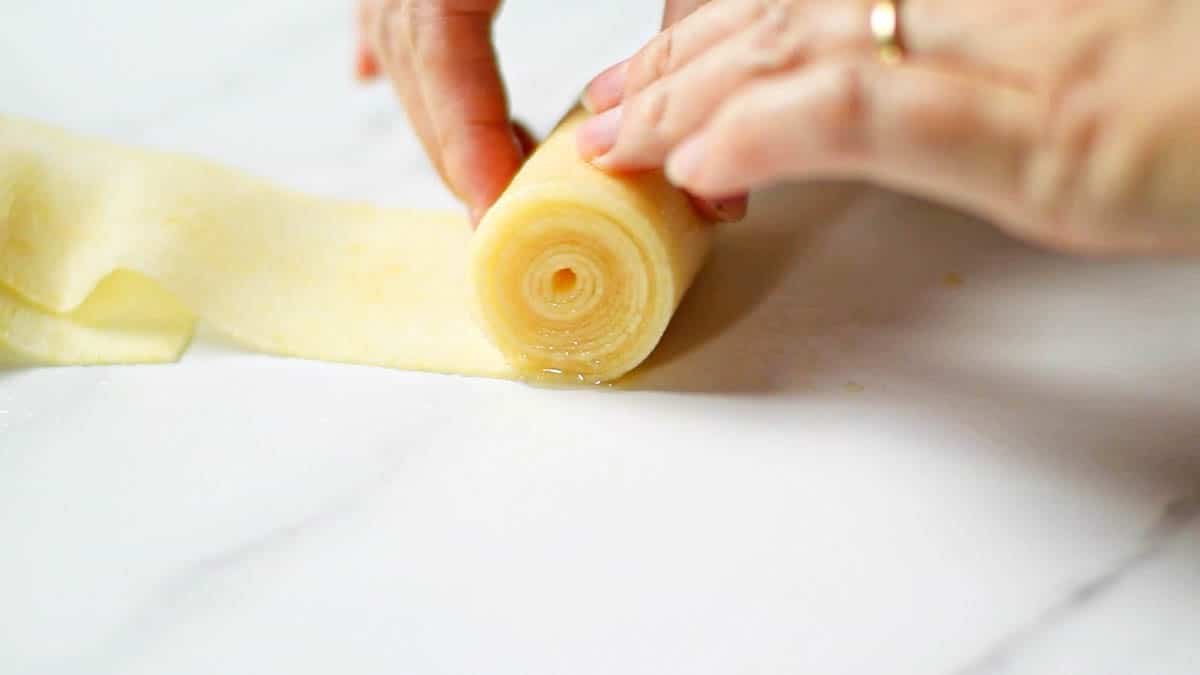
Take the apple sheets and tightly roll them to create a center. Then, continue connecting the apple sheets one by one to form a large spiral shape.
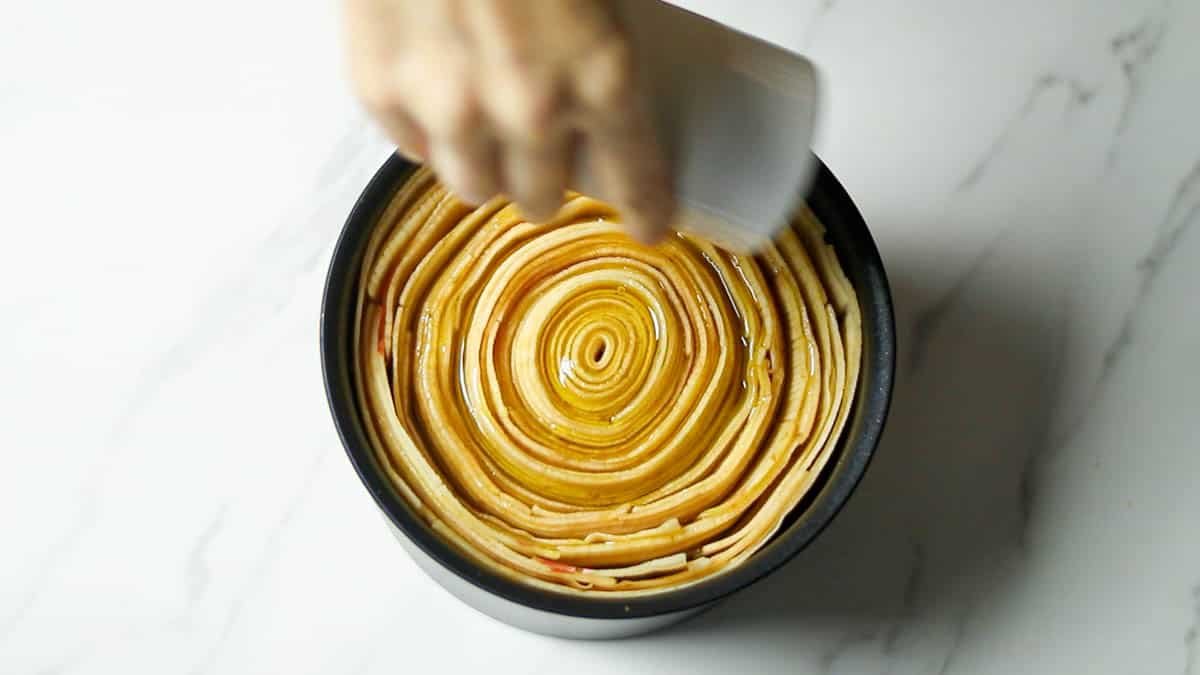
Once the spiral of apples reaches the size of the mold, gently place it into the mold. Pour the remaining olive oil (25ml) over the apples in the mold.
Bake in the preheated oven at 160°C (320°F) for about 45 minutes to 1 hour.
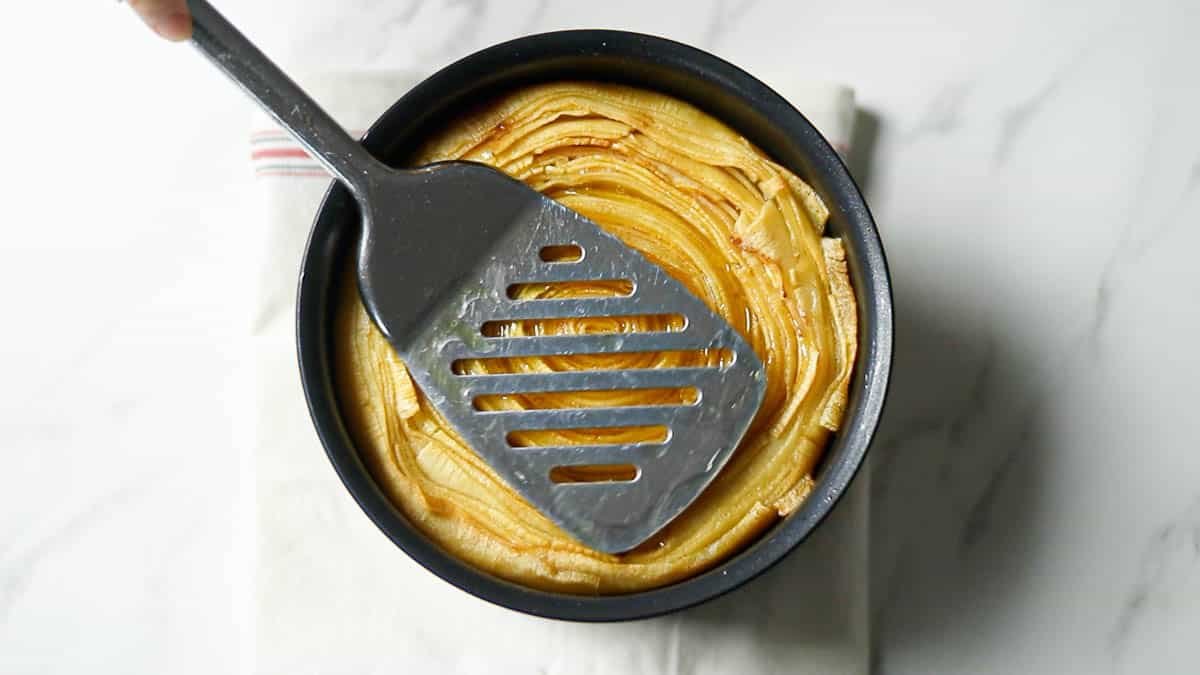
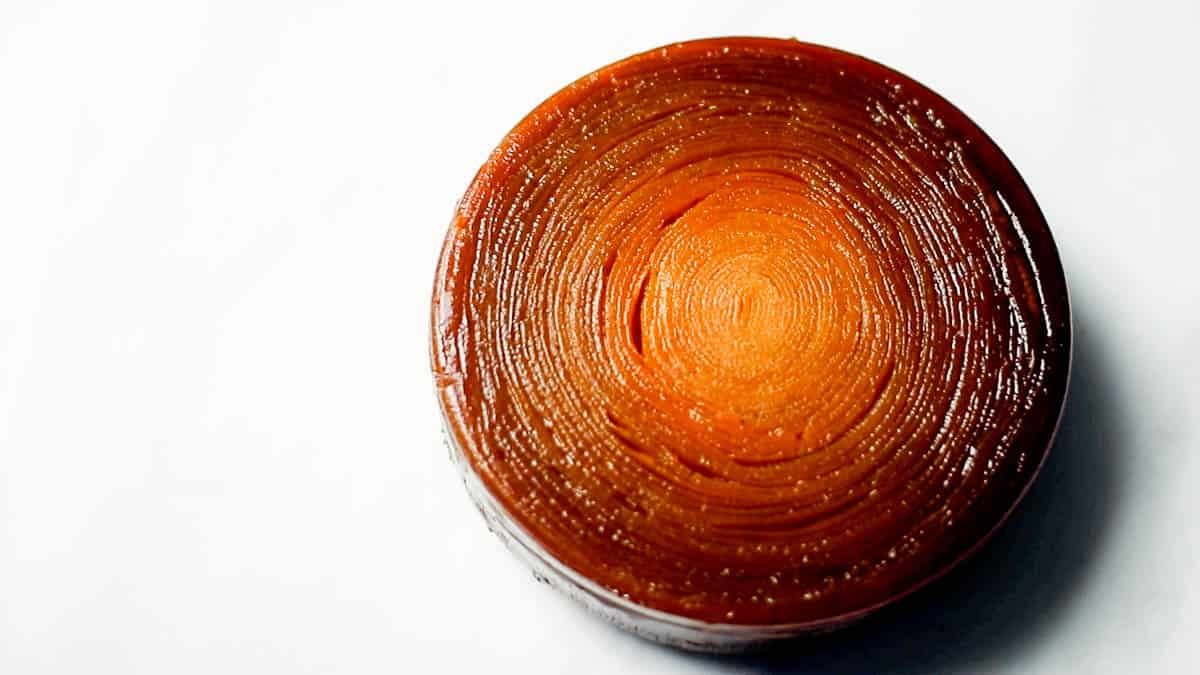
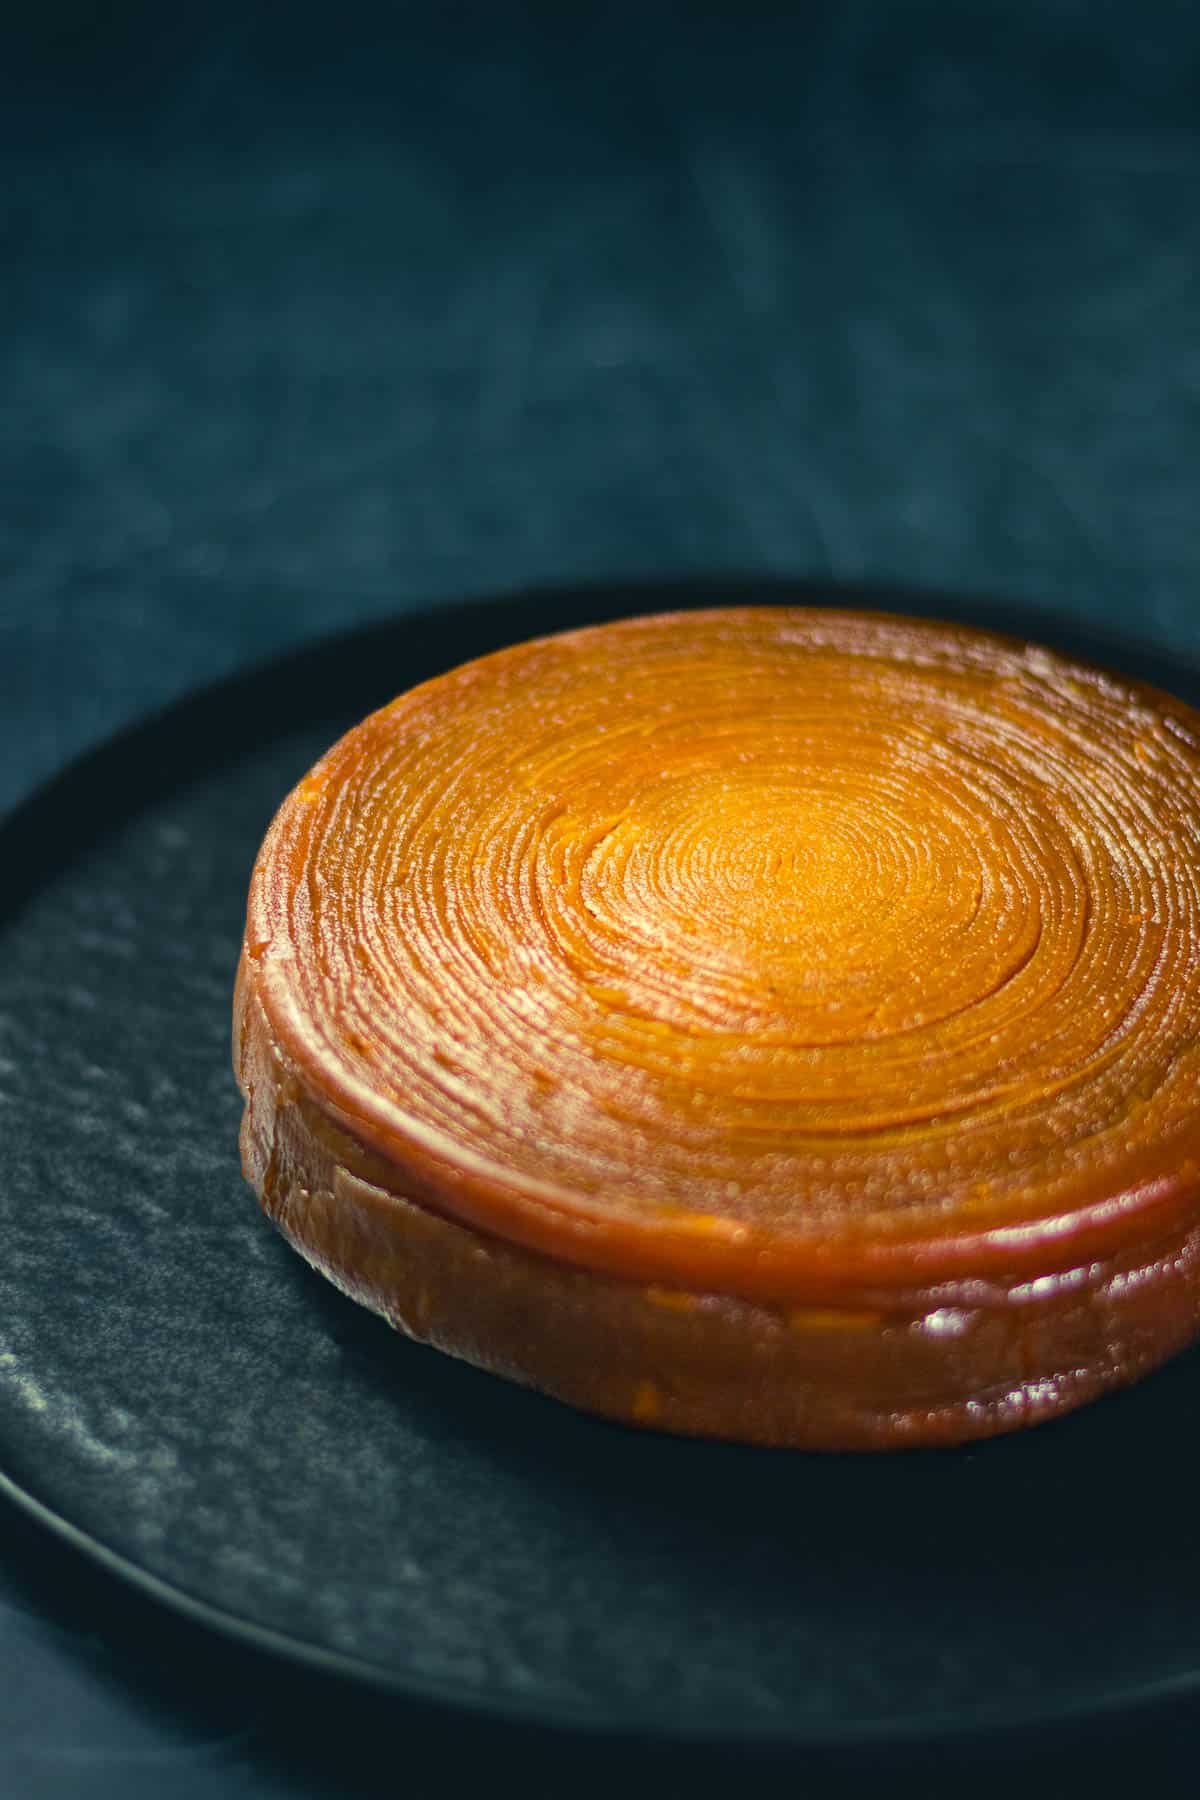
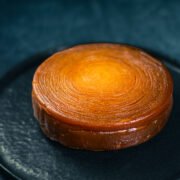
Remove from the oven and gently press down on the top with a spatula or a flat utensil to even out the height. Then, place a round cooking sheet cut to fit the shape of the apples on top of the apple layer, and place a slightly smaller cake pan or heat-resistant container on top of it. Bake for an additional 30 minutes to 45 minutes at 160°C (320°F) until the top develops a browned crust.
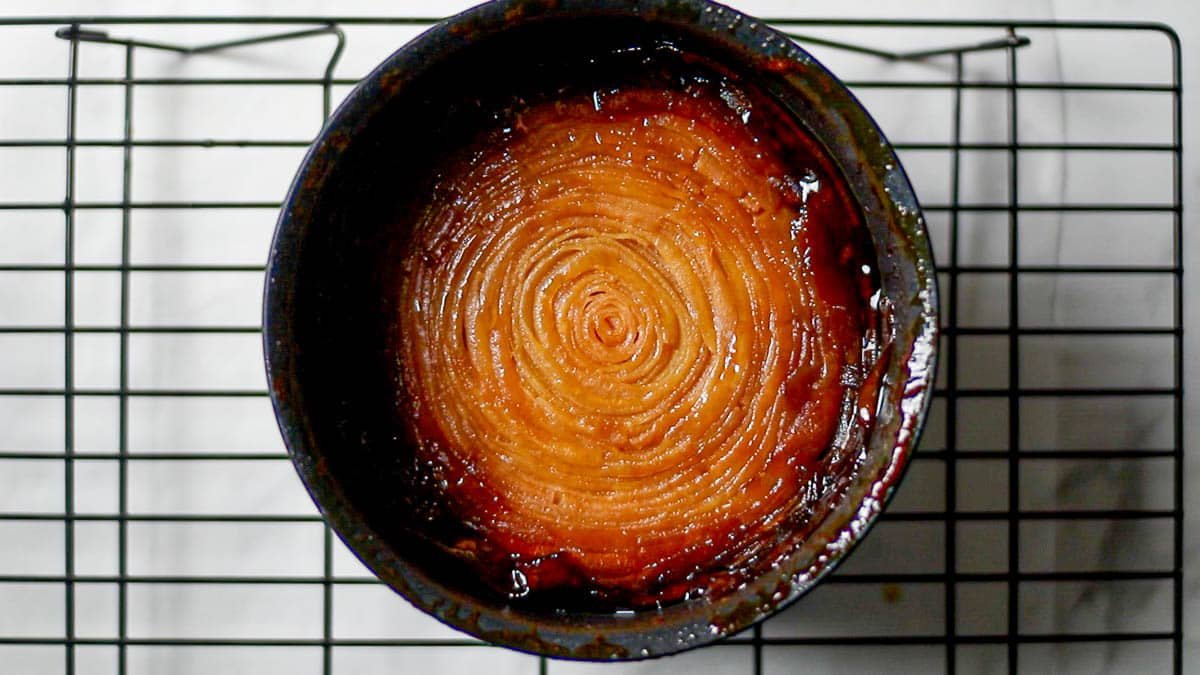
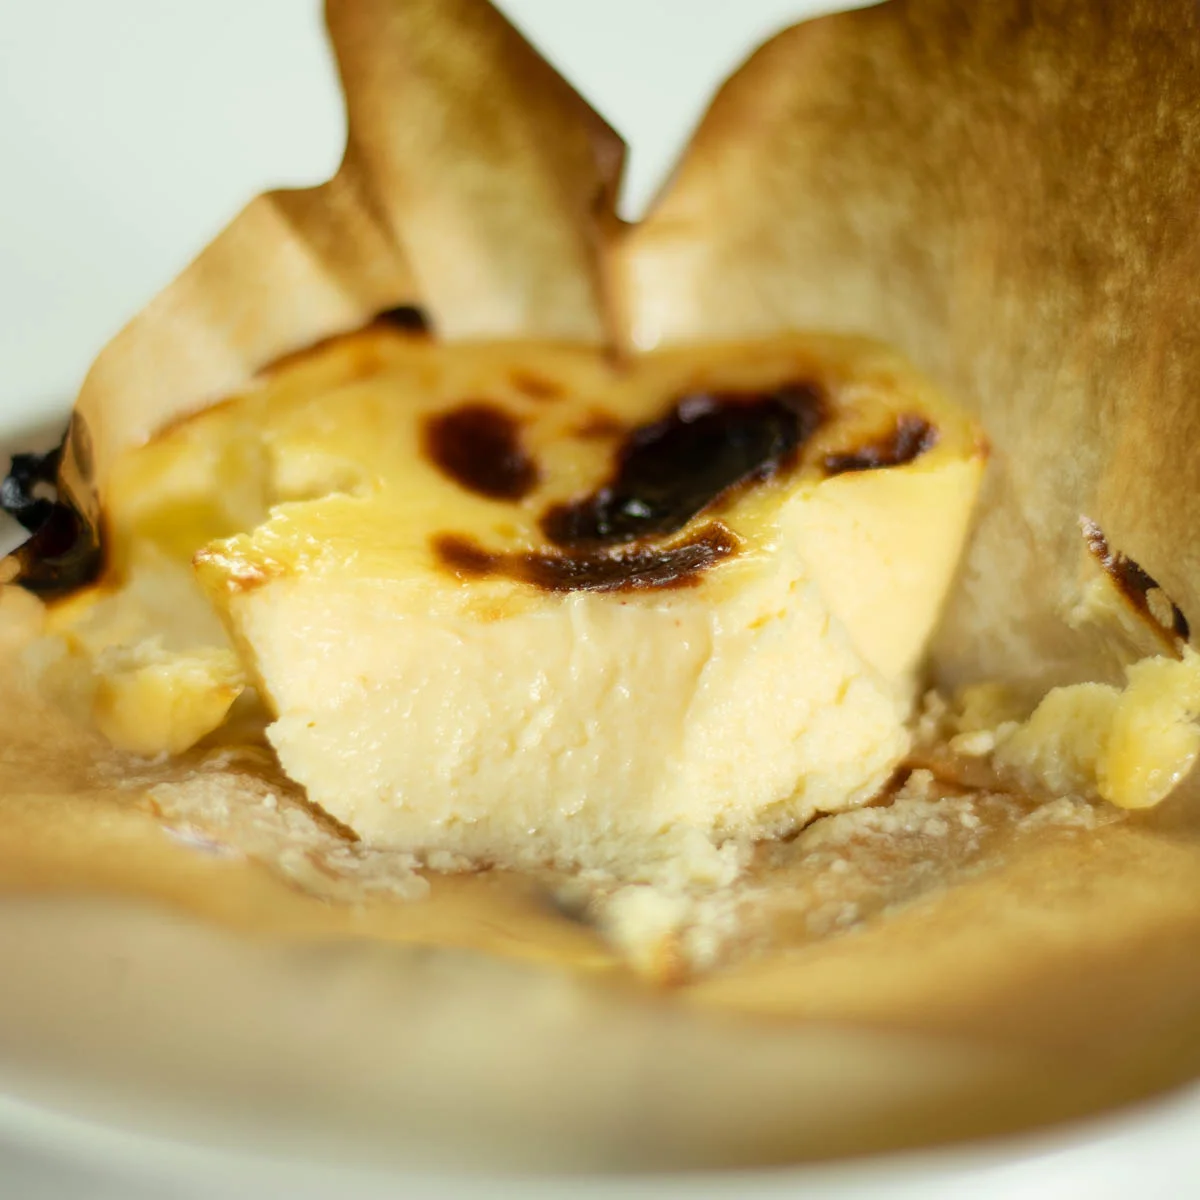
Bake until it reaches this level of browning. Once it's done baking, allow it to cool at room temperature. Ideally, let it sit overnight.
Pie crust
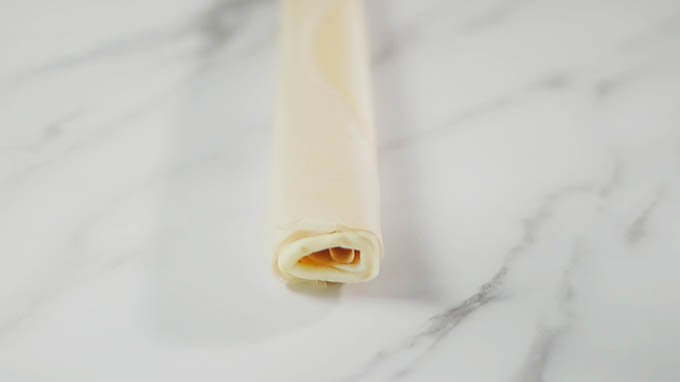
Spread out the pie sheet and roll it out with a rolling pin if necessary. Since the apple part is heavy, the pie sheet should be slightly thicker than 0.5mm / 0.02 inches. (The pie sheet I bought this time was very thin, so I layered two sheets together to make it thicker)
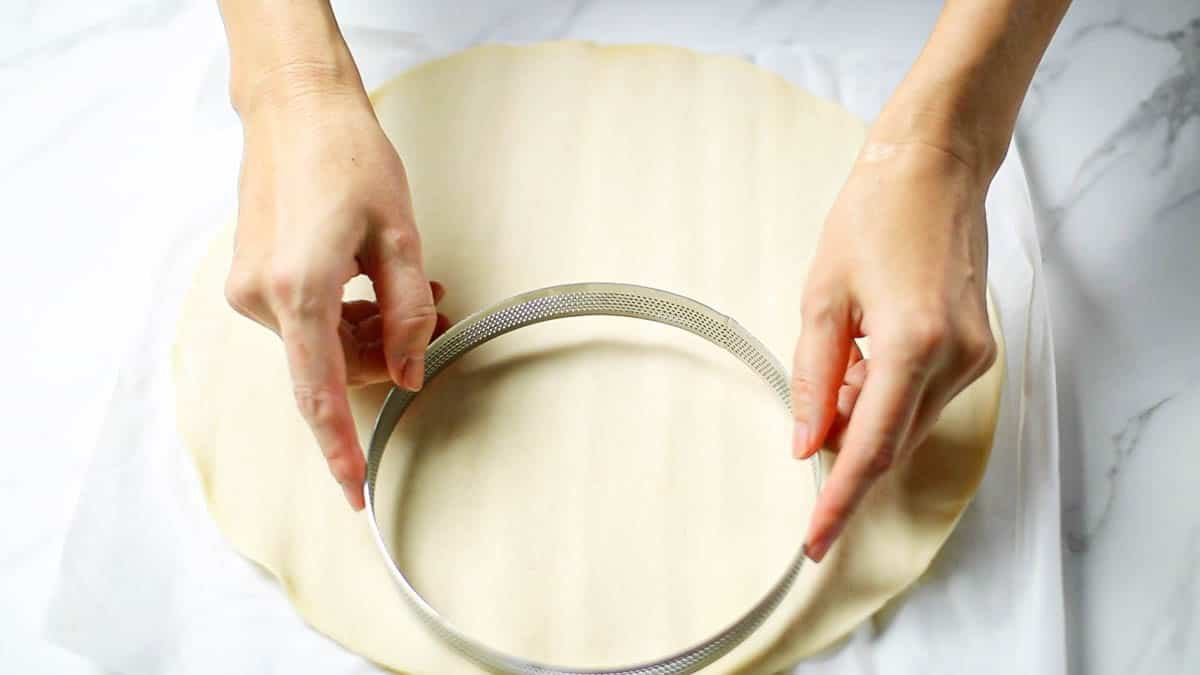
Hollow out a round shape about 1cm / 0.4 inches larger than the mold (To allow for some baking shrinkage).
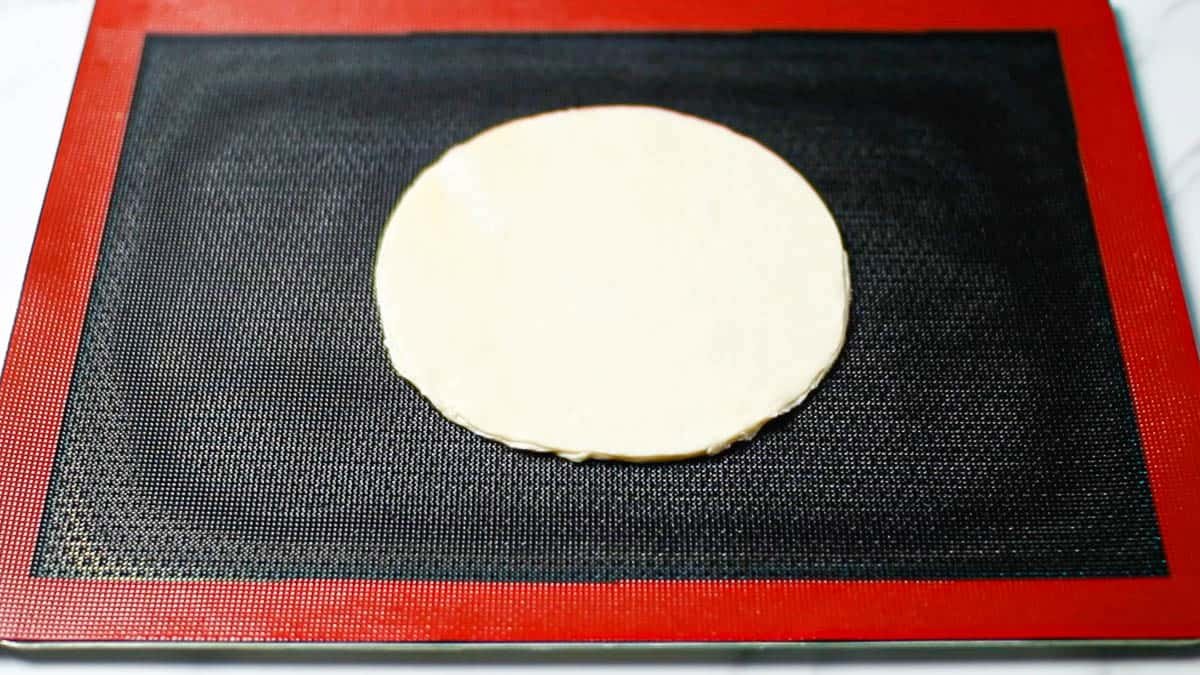
Preheat the oven to 180°C (356°F). Bake for about 20 minutes. (Using a Silicone mesh baking mat for baking is recommended as it helps prevent excessive shrinkage of the pastry.)
If the pastry starts to puff up during baking, place a baking rack on top to prevent excessive rising and ensure a compact and firm pastry crust.
Using a knife, gently insert it along the sides of the pan to loosen the apple pastry from the mold. Carefully remove the apple pastry from the mold.
Place the baked pie on top of the apple pastry, then invert it so that the apple pastry is now on top. Your tart tatin is now ready!
Storage
After preparing the tart tatin, it can be stored in the refrigerator. It can be consumed for about 3-4 days, but it is best enjoyed within 2 days. As time passes, the apples may start to lose moisture, and the pastry may become less crispy.
The apple slices in the spiral pattern may separate slightly, affecting both the appearance and taste of the tart. Therefore, it is recommended to consume the tart within the first couple of days to enjoy it at its best.
If you don't eat it right after making it, you can caramelize the pie part to make it crispy longer before combining it with the apple dough.
Equipment
You will need a vegetable sheet slicer, a tool used to cut vegetables into sheet-like shapes. Although I tried various methods without this tool, such as using a knife or mandoline slicer, I couldn't achieve consistent spiral shapes or pack the apples tightly into the pan. As a result, the apples tended to fall apart when I tried to remove the excess dough from the edges of the pan.
To be honest, I initially questioned whether I really needed this slicer for anything other than this particular dessert. However, since I was determined to make this recipe, I have no regrets about acquiring the tool.
The original recipe uses a Silikomart 18cm / 7-Inch Silicone Cake Pan.
I couldn't find a good round mold for cakes that doesn't lose its bottom, so I use a Tefal sauce pan removable handle as a cake mold.
If you're using a non-coated mold that doesn't have a non-stick surface, it can make it difficult to remove the tart after baking. In that case, it's recommended to line both the bottom and sides of the mold with parchment paper before baking. This will prevent the tart from sticking and make it easier to remove from the mold.

If you bake the pie dough separately and combine them at the end, it will be difficult because the apple cake part on top will also be distorted if it shrinks during baking. I recommend using a mesh baking sheet to prevent baking shrinkage.

How to Make Spiral Tart Tatin【Just 5 Ingredients】
- Total Time: 2 hours 15 minutes
- Yield: 8 servings (15cm / 6-inch cake pan)
Description
A stylish French pastry tarte tatin, with its exquisite caramelized apples and crispy pie crust. This recipe for Spiral Tarte Tatin requires only 5 ingredients.
Ingredients
- 150g granulated sugar
- 40g butter (salted)
- 40ml olive oil (extra virgin)
- 12-15 apples
- Pie crust (store-bought or homemade)
Instructions
Preparations
- Preheat the oven to 160°C (320°F) 10 minutes before using.
Salted butter caramel
- To make caramel, put granulated sugar in a saucepan and heat it over medium heat. As the edges of the pan start to turn caramel brown, tilt the pan or quickly mix it with a spoon to evenly caramelize the sugar.
- Once the caramel is ready, add butter and mix it together. Initially, large bubbles may form, but they will quickly settle down. Once they start to settle, continue mixing until it reaches a creamy consistency.
- Pour the caramel into the mold Wait 5 minutes for it to cool, then pour in half the olive oil (20 ml).
How to Use Vegetable Sheet Slicer
- First, wash the apples and peel off the skin. Use a vegetable sheet slicer to create apple sheets.
- Start by removing the handle-like part attached to the right side. Open the central blade attached to the spring mechanism, remove the thick needle, and place the apple on the base. Insert the needle into the core of the apple and reattach the previously removed handle part. It requires some force to firmly insert the tool into the apple, but press it firmly until it clicks into place for proper functionality.
- Once the apple is properly set, lower the spring mechanism with the attached blade. Make sure that the small green switch is on the outer side (left side) when doing this.
- Turn the handle to start creating apple sheets. Initially, only narrow sheets will be produced, so you don't need to use this part.
- As you continue turning, the width of the sheets will gradually widen. Start using the sheets from that point. When you reach the core of the apple and it becomes visible, replace the apple with a new one.
Apple dough
- Take the apple sheets and tightly roll them to create a center. Then, continue connecting the apple sheets one by one to form a large spiral shape.
- Once the spiral of apples reaches the size of the mold, gently place it into the mold. Pour the remaining olive oil (25ml) over the apples in the mold.
- Bake in the preheated oven at 160°C (320°F) for about 45 minutes to 1 hour.
- Remove from the oven and gently press down on the top with a spatula or a flat utensil to even out the height. Then, place a round cooking sheet cut to fit the shape of the apples on top of the apple layer, and place a slightly smaller cake pan or heat-resistant container on top of it. Bake for an additional 30 minutes to 45 minutes at 160°C (320°F) until the top develops a browned crust.
- Bake until it reaches this level of browning. Once it's done baking, allow it to cool at room temperature. Ideally, let it sit overnight.
Pie crust
- Spread out the pie sheet and roll it out with a rolling pin if necessary. Since the apple part is heavy, the pie sheet should be slightly thicker than 0.5mm / 0.02 inches. (The pie sheet I bought this time was very thin, so I layered two sheets together to make it thicker). Hollow out a round shape about 1cm / 0.4 inches larger than the mold (To allow for some baking shrinkage).
- Preheat the oven to 180°C (356°F). Bake for about 20 minutes. (Using a Silicone mesh baking mat for baking is recommended as it helps prevent excessive shrinkage of the pastry.)
- If the pastry starts to puff up during baking, place a baking rack on top to prevent excessive rising and ensure a compact and firm pastry crust.
- Using a knife, gently insert it along the sides of the pan to loosen the apple pastry from the mold. Carefully remove the apple pastry from the mold.
- Place the baked pie on top of the apple pastry, then invert it so that the apple pastry is now on top. Your tart tatin is now ready!
Notes
- Use apples that do not lose their shape when heated. This recipe uses Pink Lady.
- The number of apples needed will depend on their size. They may be damaged or the vegetable sheet slicer may not work well at first. It is recommended that you prepare more than the number in the recipe, as it is difficult to run out halfway through!
- Prep Time: 1 hours
- Additional Time: 0 hours
- Cook Time: 1 hour 15 minutes
- Category: Tarts
- Cuisine: french
Nutrition
- Serving Size: 1
- Calories: 424
- Sugar: 55
- Sodium: 126
- Fat: 15
- Saturated Fat: 5
- Unsaturated Fat: 9
- Trans Fat: 0
- Carbohydrates: 77
- Fiber: 9
- Protein: 2
- Cholesterol: 11
Leave a Reply